GETTING STARTED
Install Quist onto a host computer or server
- Download software using link provided when purchasing your Quist software
- Run the installer
- Reboot the host computer
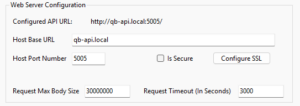
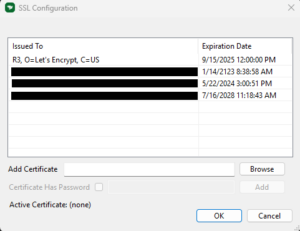
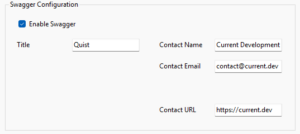
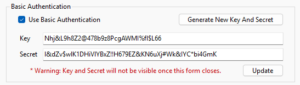
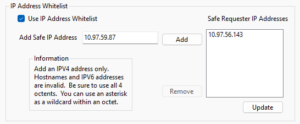
Configure Quist security and other API Server features
- Open the Quist Configuration Portal from the Windows notification area.
- Configure a host name and port number.
- (Recommended) Configure an SSL Certificate.
- (Optional) Enable and configure swagger documentation.
- (Recommended) Configure Access Control
- Basic Authentication:
- Enable Basic Authentication
- Generate or enter a Key and Secret
- Update the Basic Authentication settings.
- Basic Authentication:
- Enable an IP Address Whitelist.
(note: Once enabled, requests will only be accepted from IP addresses as seen from the perspective of the host computer)- Enable IP Address Whitelist
- Add to (or Remove form) the IP address safelist.
- Update the IP Address Whitelist settings
- Enable an IP Address Whitelist.
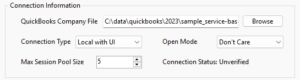
Connect Quist to QuickBooks
- Open QuickBooks and open your company file. Login with an admin account.
- (Recommended) Create a user account that will specifically be used for Quist to access QuickBooks. This will allow you to control data access levels specifically for Quist.
- On the Quist configuration portal go to the QuickBooks tab and the Connection Information section.
- Click the Browse button and navigate to and select the company file you have open in QuickBooks.
- Set the Connection type to Local with UI or Remote depending on the file location.
- Click the Test QuickBooks Connection button on the bottom of the configuration portal.
- When the connection test comes back as successful click the Save QuickBooks Connection button.
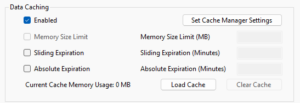
(Optional) Enable the Quist Data Cache Engine
The Quist data caching engine can greatly improve read performance for faster results when querying the Quist API. It can also allow updates to happen asynchronously as a background job rather than having your application process hold for the QuickBooks update to complete.
- Enable Data Caching
- Click the Set Cache Manager Settings button and open the Cache Manager window
- To individually manage each model type you want to cache start by clicking on the row for that model
- Check the Enable Cache box.
- If desired, to have the cache populated automatically, check the Load on Startup box.
- Set the Cache Back to field to the desired period of data you’d like cached. Some thoughts to consider:
- The further back the cache is set the larger the cache will be, and the longer it will take to populate. If you have a large company file, consider a shorter cache window.
- For list types such as customers or items, you won’t necessarily know which particular items will be needed by your application. In this case, it may be beneficial to cache back to the beginning of time of your company file.
- Set the Run Interval where Quist will check QuickBooks for any updated data. For objects that are rearely updated this interval can be set to longer periods. For more frequent updates such as Sales Orders a shorter interval should be used.
- (Optional) Enabled persistence of the cached data to Disk. This is particularly beneficial when autoloading the data cache on startup as it will make the load time of Quist significantly faster.
- After all settings have been initially setup, when enabling a data cache click the Initialize Cache From QuickBooks.
- If the cache needs an immediate update click the Update Cache From QuickBooks to sync any recently updated data.
- If the cache is no longer needed or has become corrupt, click the Destroy Cache button.
Some Recommendations
- It is highly recommended to use the security features available in Quist. It is also recommended that only known applications have access to Quist and that the API not be left open. For advanced users, locking the API down behind a 3rd party API gateway such as ExpressGateway is also recommended.
- Quist is designed to be as always available as possible so it’s data can be accessible by other highly available applications. It is recommended to install Quist on a computer or server that will be highly available (i.e. not shutdown at the end of the day). Ideally, this would not be a computer used daily by a user, but would instead be one that plays more of a server role.
- Depending on the size of the company file, Quist can use a considerable amount of system resources, primarily memory. The larger the company file, the more resources may be consumed. Make sure there are enough resources available on the host computer to handle your usage. If memory usage get’s to be too high, consider disabling the data cache for some objects types.
- Setting up the host computer to auto-login on bootup, and start Quist on login is also recommended. This will ensure the availability of Quist after system updates or other necessary reboots.
Start Integrating!
Links to usage documentation and swagger page
Examples of basic HTTP calls in Quist
Below is an example of an HTTP call for retrieving a full list of Customers using either the basic API nomenclature or standardized ODATA nomenclature.
You can get the a specific customer by specifying the QuickBooks ID using the HTTP calls shown below in both API and standardized ODATA nomenclatures.
Below is a simple example of an HTTP call for creating a new customer using either basic API or standardized ODATA nomenclature
{
"BillAddress": {
"Addr1": "2758 Senger Falls",
"Addr2": null,
"Addr3": null,
"Addr4": null,
"Addr5": null,
"City": "Turnerstead",
"Country": null,
"Note": null,
"PostalCode": "55760",
"State": "MN"
},
"CompanyName": "Senger Farms",
"Email": "joyce.mitchell@test.com",
"FirstName": "Joyce",
"FullName": "Mitchell, Joyce",
"IsActive": true,
"LastName": "Mitchell",
"Name": "Mitchell, Joyce",
"Notes": "Our first customer inserted with Quist",
"Phone": "218-461-4795",
"ShipAddress": {
"Addr1": "2758 Senger Falls",
"Addr2": null,
"Addr3": null,
"Addr4": null,
"Addr5": null,
"City": "Turnerstead",
"Country": null,
"Note": null,
"PostalCode": "55760",
"State": "MN"
}
}
Below is a simple example of an HTTP call for updating an existing customer using either basic API or standardized ODATA nomenclature
{
"ID": "80000137-1702662018",
"EditSequence": "1702662018",
"Phone": "218-461-3768",
"ShipAddress": {
"Addr1": "410 Hand Fall",
"Addr2": null,
"Addr3": null,
"Addr4": null,
"Addr5": null,
"City": "Turnerstead",
"Country": null,
"Note": null,
"PostalCode": "55760",
"State": "MN"
}
}
{
"ID": "80000137-1702662018",
"EditSequence": "1702662018",
"Phone": "218-461-3768",
"ShipAddress": {
"Addr1": "410 Hand Fall",
"Addr2": null,
"Addr3": null,
"Addr4": null,
"Addr5": null,
"City": "Turnerstead",
"Country": null,
"Note": null,
"PostalCode": "55760",
"State": "MN"
}
}
Examples of ODATA querying in Quist
Get a list of customers filtered by customer name:
Get an invoice by its PO Number:
Get invoices fully expanded and with all invoice lines and items:
Get sales orders by transaction date range:
Search for sales orders by customer full name:
Search for invoices by shipping zip code:
Get all non-inventory items:
Select a subset of fields for sales orders:
Useful Links
-
Official ODATA Standard
https://docs.oasis-open.org/odata/odata/v4.01/odata-v4.01-part1-protocol.html
-
ODATA Basic Tutorial
https://www.odata.org/getting-started/basic-tutorial/
-
ODATA Advanced Tutorial
https://www.odata.org/getting-started/advanced-tutorial/
-
Postman API Testing Tool
https://www.postman.com/
-
Quist API Documentation
https://quistsolutions.io/documentation/openapi/
